ePaper
Recently I was browsing AliExpress looking for ESP8266-related products when I spotted a bunch of epaper offerings, and I was surprised to see that they've become reasonably affordable.
ePaper displays, comprising of the display itself and a small supporting driver are available in sizes from 1" to 4", with a reasonable price limiting you to 800x600 pixels in size.
I bought one on a whim, and after waiting for a month for it to arrive to Finland I've now started experimenting. I didn't have a particular killer-use for it, but I did imagine I could start out doing what everbody else does:
- Have a display showing today's weather/temparture.
- Show also upcoming calendar appointments, from a Google calendar
- Update every 6-12 hours.
ePaper displays are very readable, and when they're not updating require very low power. That means that it should be possible to drive one from batteries for a reasonably long period of time.
The item I bought has the following listed in the specifications section:
- Operating voltage: 3.3V
- Display size: 84.8mm × 63.6mm
- Resolution: 400 × 300
- Display color: black, white
- Grey level: 2
- Full refresh time: 4s
- ..
The most obvious thing to note here is the "full refresh time" of four seconds. That's the fastest you can update it. Driving the display is a multi-step process which could be described like so:
- Calling "display clear".
- Adding some drawing operations:
- Draw a line.
- Draw a circle.
- Draw a word
- ... etc
- Calling "display update".
You batch up your operations in the middle, but the moment you call "update" it'll take 4 seconds for your display to show what you expect. That's either horrifically bad (you can't have a real-time clock with seconds-display) or acceptible depending upon your use-case.
Connecting
Connecting the hardware to the Webmos Mini D1 is pretty simple, following the example I found:
| ePaper | WeMos Mini D1 |
|---|---|
BUSY | D2 |
RST | D4 |
DC | D3 |
CS | D8 |
CLK | D5 |
DIN | D7 |
GND | GND |
3.3V | 3.3V |
Basic Operation
I found a simple library for driving the display which builds upon the Adafruit GFX library, so you'll need to install that too:
(Unfortunately the simpler library won't work with the particular display that I purchased, which is a shame because it is much more lightweight.)
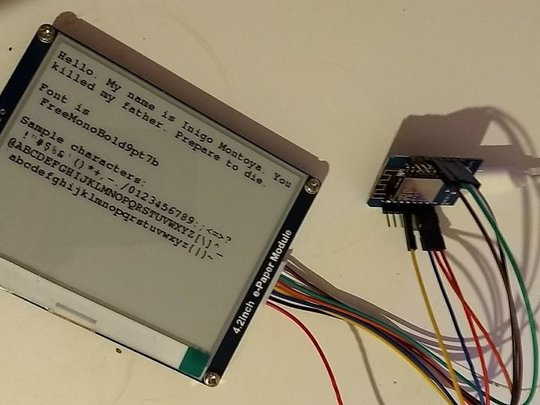
Displaying text is trivial with the GxEPD library; simply load a font and draw your text. You can move the cursor and decide where to draw too:
void setup() {
  // setup the display
  display.init();

  // colours are good.
  display.fillScreen(GxEPD_WHITE);
  display.setTextColor(GxEPD_BLACK);

  // load a font - in the library
  display.setFont(&FreeMonoBold9pt7b);

  // let the strings begin
  display.setCursor(0, 0);
  display.println();
  display.println("Hello. My name is Inigo Montoya. You killed my father. Prepare to die." );


  display.println();
  display.println("This is another line!" );
  display.update();
}
Wrapping is handled reasonably well. If you try to display a huge string it will wrap around to the next line. If you display a paragraph of text it will continue going until it falls off the end of the screen. If you wanted to implement some kind of scrolling no doubt you'd have "fun" working out how to calculate where the end of your string was, or breaking your text into lines such that you could move forward in a sensible fashion.
Output will look something like this:
|
Color Depth
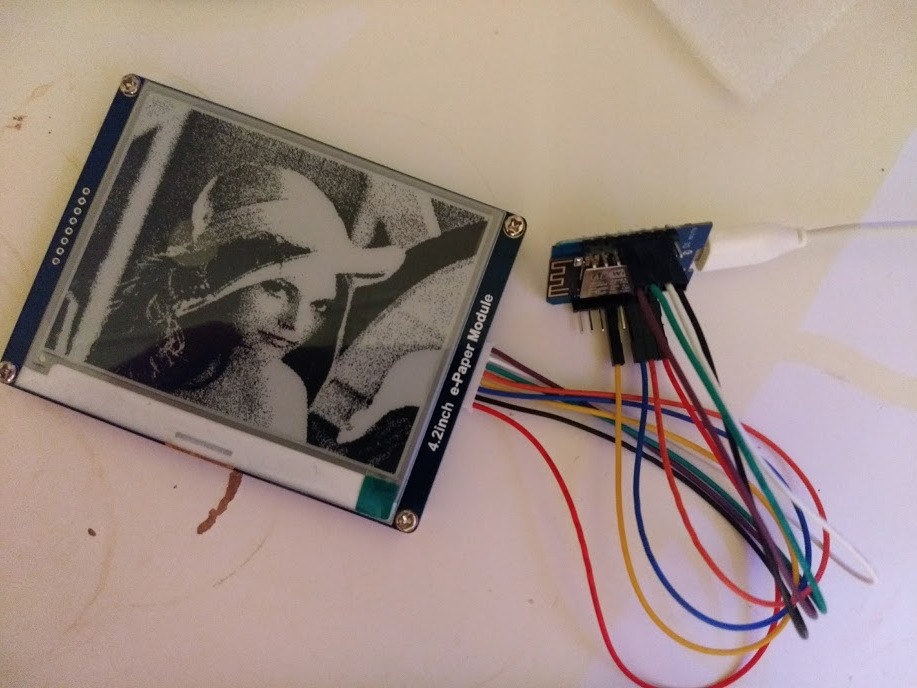
The screen I bought above has a two-bit colour depth, which means it can display only "white" & "black". There are other displays which will allow "white", "black", and "grey" which is much more useful, live and learn. (Weirdly there are also displays out there which implement "black", "white", and "red".)
Taking the classic Lenna image, and ignoring any controvosy, we start like this:
|

With one-bit output we end up with this to display:
|

That is the result of processing via ImageMagick as follows:
convert Lenna.png -monochrome lenna-1.png
(If you had another level you could use something like this instead "convert Lenna.png -colorspace gray +matte -colors 4 -depth 2 lenna-2.png".)
Displaying Images
One thing that is certain is that downloading and decoding a JPG, PNG, or similar image format is going to be very hard on such a resource-constrained device as an ESP8266, however it is possible to display images if you're careful.
The simplest way is to include your image as an inline byte-array like so:
  const unsigned char gImage_IMG_0001[] = {
    0xff, 0xff, 0xfb, 0xff, 0xff, 0xfe, 0x00, 0x08, 0x80, 0x08, 0x4a, 0x4c, 0x65, 0x2a, 0xf,
    ...
   };
Once you do that you can display the image in a few lines of code:
 display.fillScreen(GxEPD_BLACK);
 display.drawBitmap(0, 0, gImage_IMG_0001, 400, 300, GxEPD_WHITE);
 display.update();
This suffers from the obvious downside that you've eaten up your program space with data, indeed when you compile your program you'll probably see a message of this form:
Low memory available, stability problems may occur.
Ideally you'd stream the image from the network, or via the SPIFFS filesystem. That's something I'm going to look at next.
For completeness this is the end result of displaying Lenna on the display:
|
If you've got a JPG/PNG you can create a byte-array via this online site:
Streaming Images - without wasting RAM
The library support we've just shown for displaying an image requires a
continuous byte-array of graphics data. If we load the image from SPIFFS,
or over the network, we'll have to create one with malloc. No doubt that would work just fine, but it will eat up the RAM which is a problem we're trying to avoid.
My solution would be to pre-process the image we want to display, to turn it into a series of lines/pixels which can then be loaded over the network and parsed into a small buffer. This will be slow - rather than sending a bunch of data and saying "Draw this image" we'd instead have thousands of "draw a line here" operations. That said it should work, and it will avoid the need to malloc( 400x300 ) bytes of RAM.
The final step will be to write a program to run on the ESP8266 device to make a web-fetch for this encoded data, and draw it. Then we can write a simple CGI-script to build up an image containing a calendar, etc, and the device can be programmed to fetch it every few hours.
Here are the sample scripts, which use the Image::Magick library.
- export
- Read an image, in JPG/PNG/whatever format. Process it row-by-row.
- Output a series of "lines" which can be used to rebuild the image.
- import
- Read a series of "lines" which were produced by the above-script.
- Generate a PNG image of the result.
Usage is as simple as:
  perl export.pl input.png > input.dat
  perl import.pl input.dat
  (display input.dat-out.png)
(Here "input.dat-out.png" and "input.png" should look visually identical. If they don't there is a bug as the round-trip failed.)
The processing is very naive, iterating over every "line" of the image, and keep track of each successive pixel in the row.
The final step is to host this "image.dat" result upon a remote HTTP-server, and fetch it via some simple code. I found this very difficult to get working:
- Fetching the file over HTTPS failed.
- My certificate/certificate-chain is too long.
- Fetching from github.com failed.
- The remote server would drop my web-fetch at exactly 32678 bytes.
In the end I had to use straight HTTP, without SSL, to fetch the data-files. I've got a couple of sample images and processed data-files stored on this server. The two public examples are:
- http://plain.steve.fi//Hardware/d1-epaper/knot.png
- Which was processed to create knot.dat
- http://plain.steve.fi//Hardware/d1-epaper/skull.png
- Which was processed to create skull.dat
The code that fetches these, and displays them in a loop, can be found here:
https://github.com/skx/esp8266/tree/master/epaper-web-image
actual result looks like this:
No doubt the code could be simplified and improved - but the important thing is that I had to use HTTP, and I had to ensure that I didn't allocate "too much" RAM. There is a static-buffer setup in the display-driver which eats most of the RAM, use too much more and you'll get a fault.